Saturday 5 April 2014

Flat stomach secrets: How to get a toned tummy


Have you given up ever getting back to a flat stomach? Getting a six-pack is great, but if you simply want a flat stomach here are three secrets to help achieve a flatter, more toned tummy quickly! 


Getting a flat stomach is a dream for many people. Articles detailing how to get a six-pack are great to read (and it’s even greater if you achieve a six-pack), but many people simply aim to have a flat tummy to look good in a new dress or pair of jeans. So I’m going to share a few secrets behind getting a flat stomach, so you can look good in any piece of clothing!
After having my triplets, I struggled to regain the strength in my core. I was determined to figure out a way to get that perfect flat stomach appearance with my dedication to fitness. With dedicated effort, I achieved first a flatter tummy and then my goal of a flat stomach. Here are three simple tips that can help you start working towards getting a perfect flat stomach.

Best tummy toning trick 1: Suck it in

One of the first exercises that I started to do on a daily basis was to simply ‘suck it in.’ Yes, I’m talking about standing up tall and trying to pull your belly button through to your spine. The action of simply ‘sucking it in’ activates your core muscles and help you to maintain good posture. If you stand up and try it right now, you’ll notice that you instantly feel taller. Your shoulders will relax and you will immediately appear to have a smaller tummy.Now, I’m not suggesting that you walk around all day sucking in your tummy, but if you do it at regular intervals throughout the day while seated or standing you will be strengthening your important core muscles. Try to do 3 sets of 10 x 10 second holds. It’s important that you practice contracting your abs while breathing. It will take practice but it is not wise to hold your breath while contracting your muscles.


Best tummy toning trick 2: Hydrate

It’s so important to stay hydrated throughout the day, especially if you want to flatten your tummy. It’s very common for women to get a puffy appearance when they’re not well hydrated. The human body can easily hold onto excess fluid giving your tummy a bloated appearance. If you carry a full water bottle with you during the day, it will serve as a perfect reminder to meet your minimum water requirement of 8-10 glasses per day.

Best tummy toning trick 3: Plank

The traditional plank is one of the all-around best abdominal moves for developing a flat stomach! It’ll also give you a strong core and superior posture. Unlike crunches, sit-ups, and hanging leg raises, which primarily work the rectus abdominals (the vertical “six-pack” muscles) and the oblique muscles (side of the abs), planks will work several muscles groups at once. Planks blast the transvers abdominal muscles that will help to keep your tummy flat. I like all types of plank exercises. Don’t be fooled by the simplicity, if you have good form then a plank will really make you work.
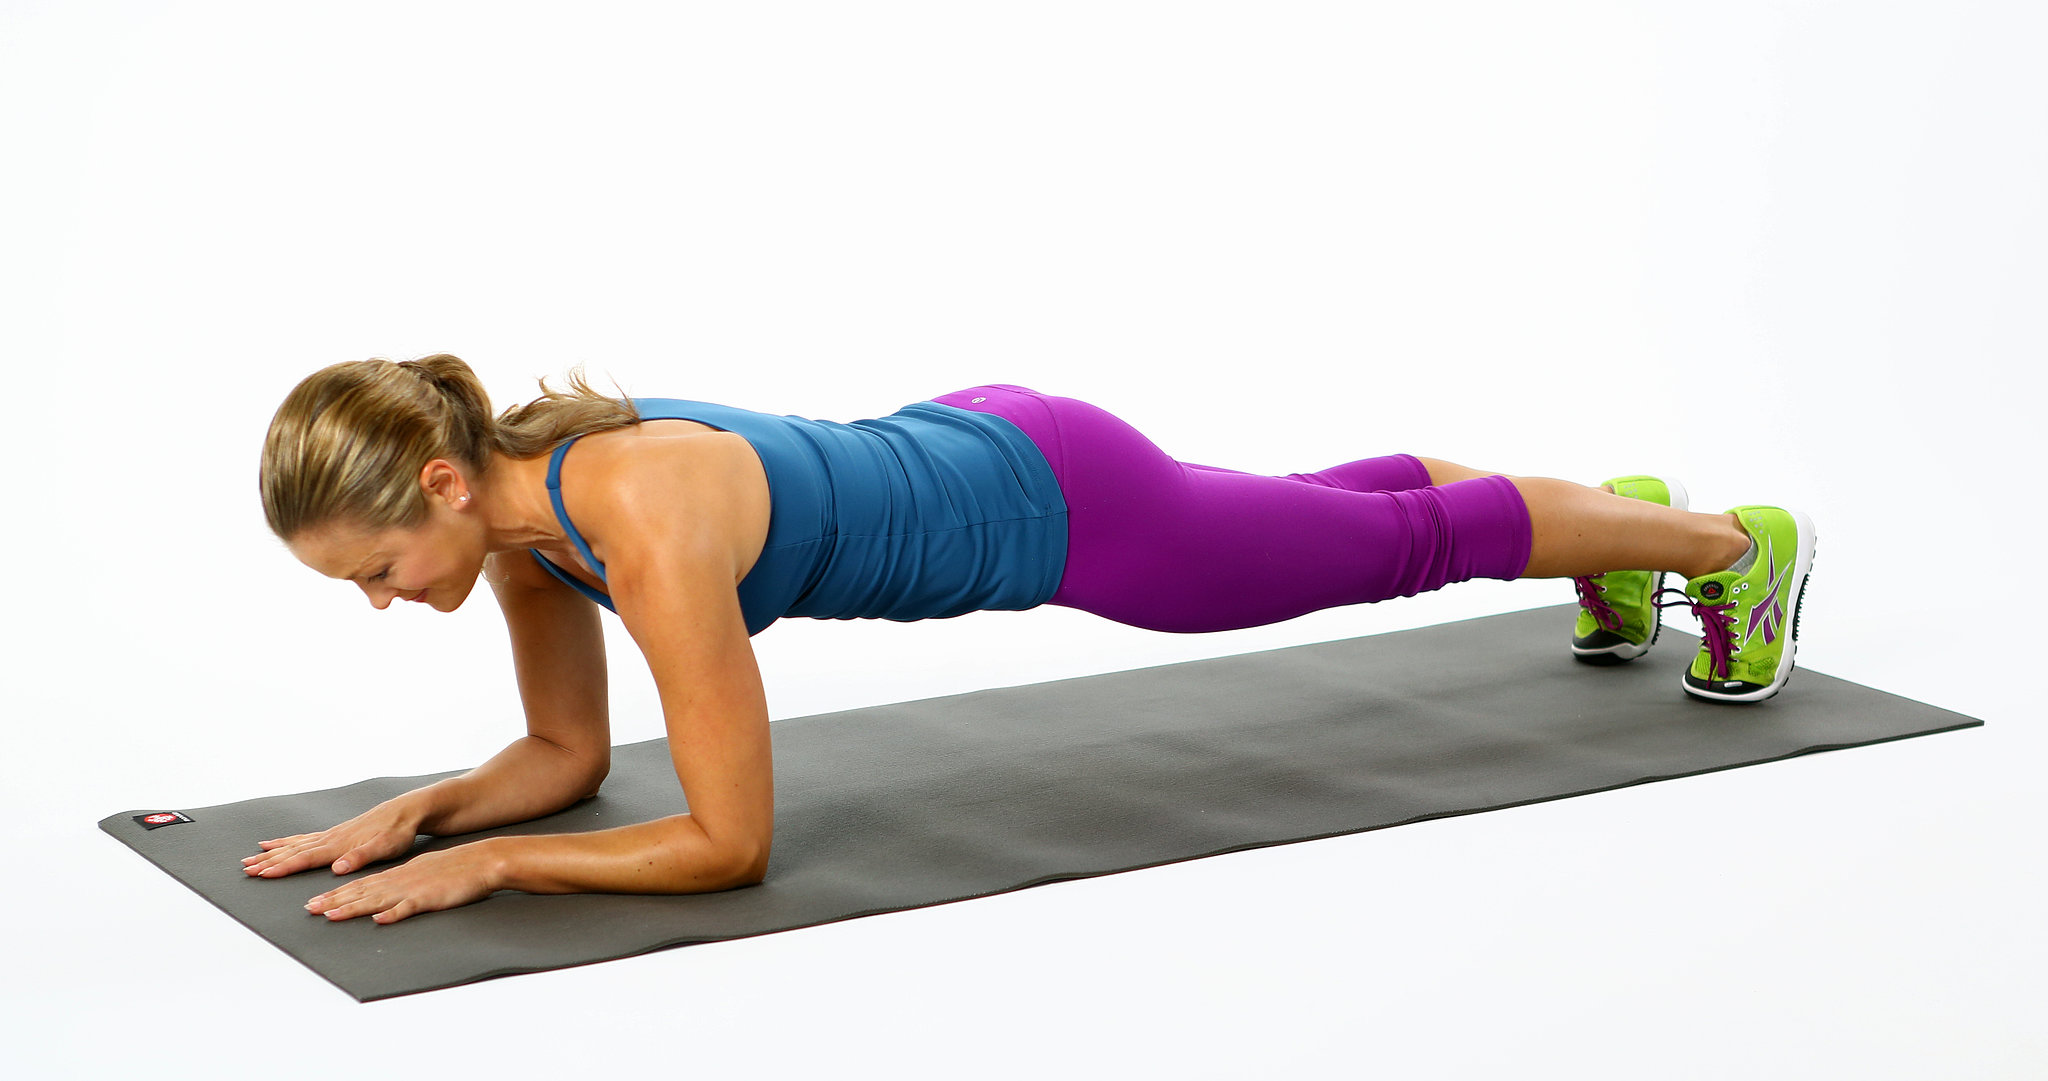
 

What is a plank? 

In plank exercises you aim to raise your body from the ground and support yourself. Think of a plank as weightlifting and toning using your own weight! A basic plank is also known as a push up plank as you adopt the same starting position. I recommend that beginners try starting out with a push-up plank. The position of a push-up plank is slightly easier to hold than more advanced types of plank exercises. Weight is distributed through the palms and shoulders which has the added bonus of really working your shoulders.

How to do a basic plank: 

Get into push-up position, making sure your wrists are directly below your shoulders. Eyes should be looking straight down to keep your neck in a nice neutral position, and your back should be flat. Pull your tummy and glutes (booty) tight. The wider apart your feet are, the more stable you will be! As you advance, aim to set your feet shoulder-width apart. Hold the plank position until you feel your form is being lost. Aim for a 10-second hold with perfect form, and then try to advance to 30-second holds.


Push-up plank versus elbow plank:

At an advanced level an elbow plank will push you to work your core even harder. An elbow plank calls for a specific arm position – rather than holding your arms straight they should be bent at the elbow. This style distributes your weight slightly differently from a basic plank and will force your core to work harder to maintain a solid plank. While a push-up plank is a great starter and maintenance position, I know that keeping my routines interesting will keep me pushing my body.

How to do an elbow plank: 

Position yourself as if you were about to begin a basic plank, then lower yourself onto your forearms. Bend your elbows so that you can lay your forearms on the floor, keeping your shoulders and elbows aligned.


***

I always advocate for embracing your natural physique. It’s great to have fitness goals, but make sure they are realistic. Body confidence looks good on everyone! Getting a flat stomach will take time, patience, and an great overall plan that includes good nutrition and a well-balanced fitness routine. I hope my three flat belly secrets help you get started working towards the perfect flat stomach of your dreams!

Written by Samantha Clayton, AFAA, ISSA. Samantha is Director of Fitness Education at Herbalife.


5 home remedies for ageing skin

Have you ever imagined snails crawling across your face or leeches feasting on your blood? If you think this is some form of torture, wake up to the world of extreme beauty treatment. In the search for ageless skin, people all over the world are looking for exotic beauty treatments that promise a youthful glow. But don’t worry if you’re not in favour of such disconcerting therapies; your kitchen holds several goodies that can help you keep ageing skin at bay.


1. Lemon juice to reduce age spots

The vitamin C present in lemons is a strong antioxidant. Besides, its bleaching action works wonders on age spots and freckles. Just squeeze out the juice from a lemon, apply and leave on your skin for about 15 minutes every day and then rinse with plain water.
For even better results, combine 1 teaspoon of lemon juice with half teaspoon of milk cream and 1 teaspoon of egg white. Mix all these ingredients and apply on the face; after 15 minutes, rinse with cold water.
Lemon juice in combination with honey is also a very effective remedy for ageing skin because honey has a soothing action. Mix one teaspoon each of lemon juice and honey and massage it into your skin. Keep for 20 minutes and then wash with warm water.


2. Coconut milk to moisturise dry skin

Coconut is a treasure-trove of vitamins and minerals; it also has the ability to moisturise your skin and keep it soft, supple and radiantly young. Grate raw coconut and squeeze the milk out of it. Apply this coconut milk onto your face; stay for about 20 minutes and then rinse it out with warm water. 

3. Papaya mask for skin firmness

You may know about papaya being good for the eyes because it has a lot of vitamin A; the same reason ensures it has a strong antioxidant action and this makes it good for your skin, too. Besides, the enzyme called papain in papaya can digest the dead cells on the surface of the skin and makes skin more elastic and firm. To make a papaya mask, cut a few pieces of a totally ripe papaya fruit and mash into a smooth paste. Apply this on the face and after 15 minutes, wash away with warm water. 


4. Rose water to tighten skin

Rose water is a cleanser and can help remove the dirt clogging the pores of the skin. It also has an astringent action which means it tightens the skin; this helps it to give firmness and reduce the puffiness under the eyes. Mix 2 teaspoons of rose water with 3-4 drops of glycerine and half a teaspoon of lemon juice. Apply this mixture to your face using cotton ball every night before you go to bed.
Or you can also make a face pack by mixing in a teaspoon of rose water into a mixture of 1 teaspoon each of curd and honey. Add this mixture into a mashed ripe banana; apply the pack to your face and after 20 minutes, wash it with cool water.

5. Cucumber and curd pack to rejuvenate skin and under-eye skin

Cucumber helps to reduce the puffiness and dark circles under the eyes; besides it also has a soothing action that keeps skin healthy. Curd contains lactic acid which has the property of exfoliating the dead cells of the skin and this helps to rejuvenate the skin. Prepare a face mask by mixing half-cup curd with two teaspoons of grated cucumber and apply this to the skin. After 20 minutes, rinse with warm water. Using this face pack about twice a week for a few months will help keep your skin healthy and young.


While the local application of a face pack can help prevent ageing, it is equally important to strengthen the skin from within by providing it the right nutrition. Vegetables, fruits, fish oils and nuts such as almond and walnut are valuable sources of antioxidants, vitamins, minerals and omega-3 fatty acids and help to keep your skin young and healthy. So make sure you eat a healthy, balanced diet and use the right nutrients on your skin and you don’t ever need to worry about leeches and snails on your skin.

Friday 4 April 2014

Natural Home Remedy to Baggy Eyes

Baggy eyes in the morning are a common problem. The reason for the problem is a combination of thin skin and fluids gathering beneath your eyes while you sleep. In kids, the problem usually goes away pretty fast, but it can linger on as you get older. Here's what you can do if you wake up in the morning with bags under your eyes.


Use a Cold Compress

Cold compresses are a good first reaction and may work pretty quickly. All you need is water, a cloth and your freezer. Simply wet the cloth until it is damp and let it chill in the freezer while you have a cup of green tea. The cloth should not be hard or heavy. Lean back in a recliner or chair, but don't lie down. Gravity helps the fluids to move away from your head and eyes. Place the cloth over your eyes. Give it at least 15 minutes.

Drink green Tea

Drinking the green tea is another trick that can help. The small amount of caffeine won't make you jittery, but it will act as a diuretic. Diuretics help rid your body of excess fluids. The antioxidants may also improve the strength of your blood vessels and promote good fluid circulation.


Use Sliced Cucumbers

Some sources say that sliced cucumbers work better than a regular cold compress. If the cucumber has been in your fridge, then the slices should work as a cold compress and may also provide other benefits.
Cucumbers contain antioxidants that may promote fluid circulation. So, if you have a cucumber handy, give it a try.

Use an Eye Cream with Decongestant Activity

The better eye creams contain the ingredients HALOXYL and EYELISS. The two formulas work together to significantly reduce bags. With regular use, a good eye cream may prevent the problem all together. If you need to look your best today and you woke up with baggy eyes, I suggest using the cold compress first and then applying a good eye cream after you shower.

Use a Face Cream with Natural Anti-Inflammatory Activity

The regular use of a face cream with natural anti-inflammatory activity can improve the function of the tiny blood vessels beneath the skin, keeping the fluids moving instead of allowing them to pool up under the thin skin beneath the eyes.


Many natural ingredients have some anti-inflammatory activity. Most antioxidants do. But one of the most effective natural anti-inflammatories is a formula called Xtend-TK. It has been shown to block inflammation before it starts. Whenever fluids gather beneath the skin, the condition can be described as inflammation.

Take Fish Oil on a Regular Basis

Fish oil is a popular dietary supplement with many proven benefits. If you have baggy eyes on most mornings, your problem may be caused by poor circulation and chronic inflammation. Fish oil helps to improve circulation. One of its best known benefits is to the cardiovascular system where it works to lower fats in the bloodstream that make the blood thicker and harder to circulate.


The better fish oils also have proven anti-inflammatory activity. One capsule might not get rid of your morning bags, but with regular use, the supplement could keep you from having the problem.

8 hair care treatments you can make yourself

Eggs, yogurt and honey are, at first glance, all components of a tasty breakfast — but they also happen to be hair treatment ingredients, and affordable, all-natural ones at that. And they're not the only ones. Did you know, for instance, that the oils in avocados more closely resemble our own skin's oils than any product in the beauty aisle does? Or that the mild acidity in lemon is an effective — and gentler — alternative to chemical-laden products? Next time your locks need a lift, save money by using one of these kitchen fixes.


For all hair types

"The [raw] egg is really the best of all worlds," says Janice Cox, author of "Natural Beauty at Home". The yolk, rich in fats and proteins, is naturally moisturizing, while the white, which contains bacteria-eating enzymes, removes unwanted oils, she explains.

To use: 
For normal hair, use the entire egg to condition hair; use egg whites only to treat oily hair; use egg yolks only to moisturize dry, brittle hair, Cox says. Use 1/2 cup of whichever egg mixture is appropriate for you and apply to clean, damp hair. If there isn’t enough egg to coat scalp and hair, use more as needed. Leave on for 20 minutes, rinse with cool water (to prevent egg from "cooking") and shampoo hair. Whole egg and yolks-only treatments can be applied once a month; whites-only treatment can be applied every two weeks.

For dull hair

Styling products (as well as air pollution) can leave a film that both saps moisture and dulls shine — but dairy products like sour cream and plain yogurt can help reverse this damage. "Lactic acid gently strips away dirt while the milk fat moisturizes," says Lisa Belkin, author of "The Cosmetics Cookbook".


To use: 
Massage 1/2 cup sour cream or plain yogurt into damp hair and let sit for 20 minutes. Rinse with warm water, followed by cool water, then shampoo hair as you normally would. Treatment can be applied every other week.

For itchy scalp

To fight flakes — brought on by poor diet, stress and climate, among other factors — try a lemon juice and olive oil mixture in your hair. "The acidity in lemon juice helps rid your scalp of any loose, dry flakes of skin, while the olive oil moisturizes the [newly exposed] skin on your head," says Cox.

To use: 
Mix 2 tablespoons fresh lemon juice, 2 tablespoons olive oil and 2 tablespoons water, and massage into damp scalp. Let mixture sit for 20 minutes, then rinse and shampoo hair. Treatment can be applied every other week.

For limp or fine hair

To add body to hair, reach for an unlikely beauty beverage: beer! The fermented drink contains generous supplies of yeast, which works to plump tired tresses, explains Cox.


To use: 
Mix 1/2 cup flat beer (pour beer into a container and let it sit out for a couple of hours to deplete carbonation) with 1 teaspoon light oil (sunflower or canola) and a raw egg. Apply to clean, damp hair, let sit for 15 minutes, then rinse with cool water. Or add flat beer only to a spray bottle and spritz onto dry hair. "When the liquid evaporates, the remaining protein residue (from the wheat, malt or hops) continues to strengthen and structure hair," says Belkin. Treatments can be applied every other week.

For dry or sun-damaged hair

Whatever your hair-dehydrating demon — hard water, sun overexposure, your trusty flat iron — nature's sweetener can help. "Honey is a natural humectant, which means it attracts and locks in moisture," says Cox.

To use: 
Massage approximately 1/2 cup honey into clean, damp hair, let sit for 20 minutes, then rinse with warm water. You can also add 1 to 2 tablespoons olive oil to loosen the honey for easier application. For extremely sun-damaged hair, trying mixing honey with 1 to 2 tablespoons of a protein-rich ingredient, like avocado or egg yolk, which will help replenish the keratin protein bonds that UV rays attack. Treatment can be applied once a month.

For oily or greasy hair

"Used properly, [cornmeal or cornstarch] is an inexpensive way to remove oil and grease," says Belkin.


To use: 
 Pour 1 tablespoon cornmeal or cornstarch into an empty salt or pepper shaker and sprinkle onto dry hair and scalp until you’ve used it all. After 10 minutes, use a paddle hairbrush to completely brush it out. Treatment can be applied every other day.

For frizzy hair

Home beauty experts swear by avocado — and not just to repair damaged hair. Its oils (which are light and moist like our own natural skin secretions) and proteins boast the best combination of nutrients for smoothing and weighing down unruly hair, explains Cox.

To use:  
Mash up half an avocado and massage into clean, damp hair. Let sit for 15 minutes before rinsing with water. Amp up moisturizing power by combining mashed avocado with 1 to 2 tablespoons of a hydrating ingredient, like sour cream, egg yolks or mayonnaise. Treatment can be applied every two weeks.

For residue-ridden hair

"Nothing eats through product buildup like baking soda," Cox says. Sodium bicarbonate essentially breaks down anything acidic.


To use: 
 Mix 1 to 2 tablespoons baking soda with small amounts of water until a thick paste forms. Massage into damp hair and let sit for 15 minutes. Rinse with water, then shampoo hair. Treatment can be applied every two weeks.

Wedding day beauty tips: how to look & feel stunning

One of the most special days in any woman’s life has to be her wedding day. We choose our bridesmaids, pick our color scheme and even fantasize about our Prince Charming from the time we can walk. For some of us, all roads lead to the most magical day of our lives; the day we say, ”I do”.


Betty has been planning her wedding for quite some time and it is now right around the corner. Her big day will take place in beautiful Thailand. While that sounds amazing, adding international travel on top of an already stressful situation can be challenging, especially when you want to be at your very best physically, mentally and emotionally.
For Betty, like all brides, the wedding day is the perfect occasion to shine. Of course she wants to look gorgeous but she also wants to be radiant, confident, sexy and demure for her groom. Remember, all eyes are on the bride on this very special day and it’s important to exude confidence without a worry in the world. This effortless beauty will be captured in memories and photographs that will last a lifetime.
To help ease a bit of stress and get Betty prepared for her big day here are some wedding day beauty tips.

1. How to prepare for your wedding with as little stress as possible.

Plan ahead! 
The morning of the wedding is not the best time to start experimenting with hair, makeup, nail polish – Anything! In other words, you need to plan ahead, well ahead for the best results. If you are a brunette, don’t go blonde right before the wedding. If you have never had long fingernails, it’s probably not the best time to get extra-long acrylic nails put on. And, if you’ve never worn big fluttery, fake eyelashes you may wish to rethink. Keep things simple and close to your personal comfort zone. Think classic not trendy! By planning your look well in advance of the wedding you will surely eliminate unnecessary stress and look fabulous as a result.


2. Practice makes perfect!

Betty, is smart. She is already practicing with different hair styles and techniques in anticipation of the big day. She and a friend are right now practicing with rollers to achieve her desired wedding day hair style. My wedding day beauty advice to Betty is to keep doing exactly what she is doing. Practice wearing different hair styles that compliment your dress and your veil. Think about the photos you wish to have and also think about looking back at your wedding album 20 years from now. Will you say, Awwww, look how cute we were? Or will you say, Oh my gosh what were we thinking?

3. A few wedding day beauty tips

Look for inspiration. Start tearing pictures out of magazines and searching on line for gorgeous wedding hairstyles. When you see something that you like be sure to save it so you can share with your hair stylist or start to practice the styles yourself. Be conscious of your dress and veil. It’s important that your hairstyle fits your wardrobe and not the other way around.
Get your hair trimmed to eliminate any split ends or frizzies which will keep hair from looking polished and smooth. Do any trimming or cutting about 2 -3 weeks before the wedding, so it looks completely fresh and natural.


For Betty, it’s about six weeks until her dream wedding so, now is the time to give her hair a nice moisture mask to help repair and replenish the hair’s tresses so they look as healthy as can be. You can achieve a nice deep conditioning treatment by slathering your hair with a good moisturizing conditioner, putting on a shower cap and relaxing in a hot steamy bath. Try a weekly treatment up until one week before the wedding. Since Betty has hair that is a bit on the longer side, by focusing just on the ends of her hair she can really make a difference.
If budget (and logistics) permit, hire a professional hair stylist for the day. Meet with the stylist a week or two prior to the wedding for a practice run and don’t forget to bring your veil with you and even a photo of your gown. This way you can see exactly how you will look pre and post wedding ceremony.
Wash your hair the day before – not on the morning of your wedding. The extra oils and product that are left lingering in your hair only help your style, especially your curls, stay put and last longer. When hair is freshly clean it won’t hold a style as long.


Betty’s Bonus Tip:  
If you’re going to rock a complicated hairstyle or you’re not confident that your crowning glory will last all day then plan for the worst. Have a friend or bridesmaid pack a bag of hair essentials to take the worry out of the day. Bring along a curling iron, flat iron, some hair spray, a few hair pins and even a can of dry shampoo in case you need any last minute touch-ups as the day progresses.

4. Flawless skin for the big day!

Betty is not alone. She, like countless other brides, wants her skin to look radiant on her wedding day. With the stress of the event, not getting enough sleep, dealing with family and friends and traveling, etc. this can be a challenge and flare ups can be inevitable. There are some quick and easy tips that Betty can start doing immediately that will make a big difference on the day of her wedding.
Take it all off! No matter what your skin care practices were up until now, as the wedding approaches you cannot go to bed without thoroughly cleansing your skin. All traces of makeup, especially mascara, must be removed at bedtime. One night of sleep with makeup on your face can leave your skin looking dull, dry and well, just not healthy. So a good cleansing using warm water and a facial cleanser is your first step towards radiant skin.


5. Moisture, moisture and more moisture!

Our skin always looks best when it is hydrated. Never go to bed without applying a nice, rich Night Cream that will hydrate your skin while you sleep. In the morning after cleansing the skin again, be sure to apply a hydrating day lotion to keep your skin soft and supple. With Betty traveling to Thailand, her skin can easily become dehydrated just from sitting on an airplane for so many hours, so extra hydration is critical. Apply, apply and reapply. And remember, if you are going out into the sun, be sure to use a product containing SPF to keep your skin from burning and, dare I say it, aging.

6. The eyes have it!

If Betty is like me, she may shed a tear or two on her wedding day. Tears, coupled with a nervous nights sleep and a few glasses of champagne at the reception can really make our eyes look tired and droopy. So it’s important to get the skin around our eyes in tip top shape well before the big day. Invest in a nice Firming Eye Gel for daytime use that helps tighten the skin around the eyes and look for a Hydrating Eye Cream to wear at bedtime. And whatever you do, don’t forget the waterproof mascara.


7. Scrub a dub dub!

Preparing the skin for the big the day doesn’t just end at the face. For a bride, every inch of her skin needs to be smoothed and polished to perfection. A good exfoliating scrub can help remove dead and dull skin cells from the surface of the skin and, for the face, this is something that is imperative. Exfoliating once a week leading up to the wedding is great for the skin and will also allow Betty’s makeup to stay on longer and look smoother and fresher. But, we can’t stop there. All exposed areas need to be scrubbed. Arms, elbows, knees, feet, legs, you name it. You can even make your own body scrub using sugar and olive oil! A good exfoliation followed by a great moisturizer and your skin will be soft, smooth and kissable well into the honeymoon.

8. Choosing the right makeup

There are many things to consider when selecting the right makeup for the wedding day. Of course, Betty wants to look flawless and fresh, sophisticated yet sexy and her makeup needs to look wonderful in photographs. If a professional makeup artist isn’t in the budget then just do a bit of investigating. Flip through bridal and fashion magazines, look online for pictures. And, my favorite tip? Go to the makeup counter and get a free makeover! Look for softer more natural color pallets and try to avoid the dark, bolder colors. The cosmetic counter consultants are a valuable resource to anyone who is trying to find the appropriate products or shades to wear. They can also demonstrate for you exactly how to apply the products for the best look. Be sure to tell them you are preparing for your wedding day and they will know exactly what products to recommend. Bring along your bridesmaids or Mom and make a fun day out of it.


9. Some final quick beauty tips for Betty’s wedding day

Pack a “quick fix” bag for the reception. No worries is the name of the wedding game, so be sure to bring along some touch up makeup, nail polish in your shade of the day, deodorant, mints for quick breath freshening and even a pair of comfy shoes or an extra pair of nylons in case you get a run, anything that you can think of that can help reduce any last minute worry or stress and keep your perfect day on track.
Pay extra special attention to your teeth. Be sure to brush and floss regularly and if a professional whitening is out of the question before the big day, pick up a bottle of whitening mouth rinse at least two weeks before the wedding day. Your teeth will sparkle every time you smile.
Take a good long look at yourself. Are your eyebrows neat and tidy? Are your hands in tip top shape? Take a few minutes to look at yourself. Compliment yourself on all of the positives that you see and smile just thinking about the wedding dayl


10. Relax and enjoy!

Leading up to the big day Betty and her groom can also engage in some couples activities to prepare for their day. They can get a relaxing, couples massage or just simply spend some special, quality time giving each other foot massages while laughing about the planning process. They can enjoy a nice quiet dinner at home and take the time to watch an old movie together. Staying relaxed and calm during such a stressful time only increases the bond between a couple and can only make the entire experience, from start to finish, even more memorable.

“And they lived happily ever after…”

Thursday 3 April 2014

Make your own face-masks

Face skin is the most delicate one. It is essential to take care of it on a daily basis. And so, when you are not keen on spending a lot at spa for facials, try some quick home methods to let your skin glow:


1. Quick mask to brighten your skin:

Take a slice of ripe papaya, remove seeds and pulp. Rub the inside of papaya peel on your face, neck and hands. Let it dry for 15 to 20 minutes, then wash it off. Try this mask twice a week.

2. For daily cleansing and toning:

Brew a cup of green tea and cool it. Then soak two clean, round cotton balls in the tea and squeeze out any excess liquid. Place one on each of your eyes for 15 minutes. Also, apply this tea as toner on your face daily.


3. Mask to tightening skin:

2 tbsp plain yogurt with 1 tbsp fresh lemon juice and apply to your cleansed face and neck. Let it dry for 20 to 30 minutes. Wash it off with running water.

4. To moisturize your face:

Combine 2 tbsp honey with 1 lemon juice. Apply to your clean face and leave on for 20 minutes. Wash it off.