Friday 18 July 2014

Diy Ripped Jeans


Ripped jeans are fashionable and very trendy no matter the season. 


This trend been going on for years now and seems is here to stay because everyday more I see girls wearing ripped jeans and made me think that I should get a pair myself and see how it looks on me. Having some old jeans on the side I thought to try it out and make my own ripped jeans. In the tutorial above I am going to show you how to create the store look alike jeans so you can make them too without much effort. 

You will need: a pair of jeans, scissors and a  fork. Follow the steps displayed in the picture above and I hope you like this idea.

calca-jeans2_blog


DIY Summer updo


These are also some things that we can closely provide a whole look and check out the difference and the trends that come along with these hot new hairstyles. 

As always, we need to make sure though that whatever trends that we are following on these areas, we can always get that opportunity to work with whatever hairstyle that will also fit with whatever it is that we always wanted.
  

 In this regard, it can also come along with the different introductions that we see in looking closely towards how well this can be managed and given the opportunity to work upon using these hairstyles. As always, we can consider the great opportunities, that this will always give us in enhancing our looks and providing us with best details needed instead that can make a whole lot of beginning with whatever we will look closely at and follow using these short and trendy hairstyles especially during the summer months.

Cat Eye Makeup Looks


Cat eye makeup is a huge trend at the moment; thus, lots of variations of this classic look have appeared. The cat eye is not the easiest to do, but once you have mastered it , you can play around with colors and shapes.


Here are 6 ideas of how to do it! Don’t forget the dark mascara in all of these looks.


  • Line slightly with black eyeliner and on top of it add a sparkly red color with a slight wing in the end.
  • Apply a thick black line along the lashline and contour over it with a thin white one. Contour around the wing with the white eyeliner too.
  • Line below the eye with a black eyeliner and finish with a wing. Draw a thick, metallic blue line over the lashline, and draw a wing which is a milimeter higher than the black wing.
  • Draw a black line along the lashline. Then draw another black line leaving a small space between the liner contours. Connect the wings of both lines at the corner of the eye.
  • This cat eye makeup look is maybe the most extravagant one! First, line the inner corner of you eye, below it, with black eyeliner. Draw a lightly-colored line on the eyelid from the inner corner, diagonally spreading to the end of your brow. The wing will look like a thunderbold.
  • Apply very thin black line along the lashline. Contour over it with a light color and finish with a wing.
cat eyes looks

Lived in Liner – Tutorial


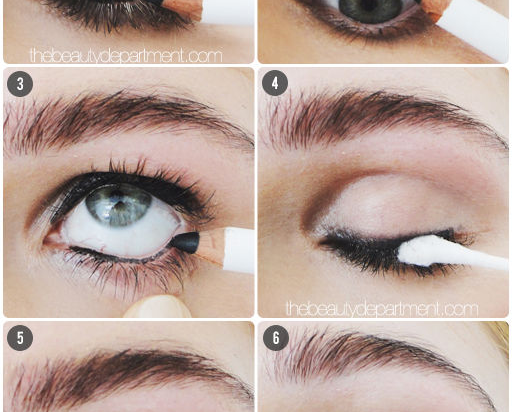
There are days when you are not in a mood for spending much time in front of the mirror. We are suggesting you a makeup style just for those days, it says: “Hey, I’m looking great without spending my entire morning in front of the mirror.” Eye liner and mascara sometimes can make miracles.


  • Apply eye pencil above the eyelashes line and below it by pulling gently the eye lid with your fingers.
  • Apply also at the top line of the bottom row of lashes.
  • Take a cotton bud and firmly take pencil from the upper lashes and apply the same materila under the bottom eyelashes.
  • Apply mascara and you are done!
lashesdd

Pink Eyeliner Tutorial For Every Girl

A pink eyeliner is not something you see every day, and yet it gives out fresh and positive vibes. Not only that, but you will also differ from your surroundings!


It’s very easy to apply, you will need a white eye pencil, a brush as shown in the picture below, pink shadows and mascara. Firstly you draw your line with the white pencil, then you dip the brush in the shadows and gently spread them over the eye liner.


pink liner 
 
For a complete luck put on mascara and a cute white dress and let’s go out!

Thursday 17 July 2014

Doll Eyes Makeup Tutorial

This bold look has a very dramatic touch to it: that is why it is compared to a doll’s eyes. Its charm lines in the combination of black and white eyeliners. Here is how to achieve the same effect:

  • Apply a thick line of white eyeliner under your eye for a glowy look, then smudge with slightly with a thin brush.
  • Now using a black gel liner, contour the waterline from the middle to the outer corner of the eye.
  • Apply black liquid eyeliner on your upper lashline and finish it with a wing at the outer end.
  • Smudge the black color gently with a brush for a more dramatic finish.
  • Blend in the black and white colors in the outer end of the eye so that the transition is smooth.
  • Apply a generous layer of black mascara.
dolls eyes

Apply Red Lipstick – Tutorial


Making your lips sassy and red isn’t an easy job. You should match the whole look with the lips in order to look good. The biggest problem is to steady the lipstick not to go around your mouth. So, take a look how to make a perfect red lips:


Start with a red lip pencil

Exfoliate your lips to hide any dry skin. Use a thin layer of lip balm to moisturize lips. Remove the lip balm after 15-20 minutes. After that apply foundation or a concealer on lips. It will work like a lips primer. Start by contouring with the pencil your cupid’s bow ad it is shown at the picture. Then apply some guide points at your lower lip and at the sides. Use the picture for a concultant. Connect the dots. Cover the corners of the mouth. Fill in the contoured lips.
Apply lip balm

Use a clear one. Keep retouching your lips with the balm all day long and be sure that you color will stay in place whatever you eat or drink.
Here comes the lipstick. It’s better to use a lip brush. Now you have your sexy lips. Clean the area around the mouth with a concealer.


red lips

The trick for red lips is nice and clean skin. Enjoy, girls!

Contouring and Highlighting for Beginners


This is an easy, contouring and highlighting for beginners. Its purpose is to emphasize the angles of your face and hide your flaws. 


  • Apply a generous amount of highlighter below your eyes, on your cheeks, just where your cheekbone is, on your nose, chin and on the forehead with an upward motion.
  • Apply bronzer on the upper line of your forehead, on your cheekbones and around your nose. You can contour a little below your underlip.
  • Blend the colors well until they create shadows and are not obvious.


contouringrr

You can see how there are more angles and emphasis on your good sides now! Don’t forget to add some blusher to your cheeks. Finish with a light or strong eye makeup, depending on the occasion you are preparing for.

Shimmery Lip Tutorial


 This great choice of lip color works on every skintone and for every occasion.


  • Contour your lips with a lip liner.
  • Make sure that the line is very thick and go even into the middle of the tip.
  • Apply a mauve lipstick.
  • Apply a shimmery golden color with a pencil or other pigment.
  • Apply a little sheer or again mauve lip gloss over the shimmer.

lips
Very glamorous and very chic! You can see that a little goes a long way and makes a difference in your overall makeup routine!

Wednesday 16 July 2014

Chest Highlight and Contour

 check out how to highlight and contour your chest ! 


I think you all have seen a lot of face makeup contouring, but this is different…. It seams that contouring is for chest too! What do you think about this?!


 Hope you like it ^_^

Monday 14 July 2014

8 Makeup Tips That Nobody Told You About PART 9

follow these tips to get that feminine look you always wanted 

1. Apply eyelash glue to false lashes with the tip of a clean bobby pin. 
  

Use the tip of a bobby pin to evenly disperse the glue along the base of your falsies. Then, wait a few seconds for the glue to get tacky and apply! 

2. For long-lasting lip color, swipe on your shade, lay a tissue over your mouth, and then dust translucent powder over it to set the color.


This process may seem extensive, but the payoff is worth it. Not only does the translucent powder set a bold shade, like Elizabeth Arden's Ceramide Lipstick in Rouge, making it instantly long-wearing, but the tissue acts as a shield to your lip color, protecting it from lightening or losing it's vibrancy. (Translucent powder, even though it's supposed to be clear, still has a subtle white tint to it that can alter your lip shade.) (Tip via makeup artist Lauren Cosenza.)

3. Mix loose pigments with a salve or petroleum jelly to make your own custom lip gloss. 

If you have loose eyeshadow pigments that you're obsessed with and want to wear as a lip shade, blend it with a little bit of a salve, like VMV Hypoallergenics Boo-Boo Balm, or petroleum jelly in a spoon and swipe it onto your lips. Voilà! 

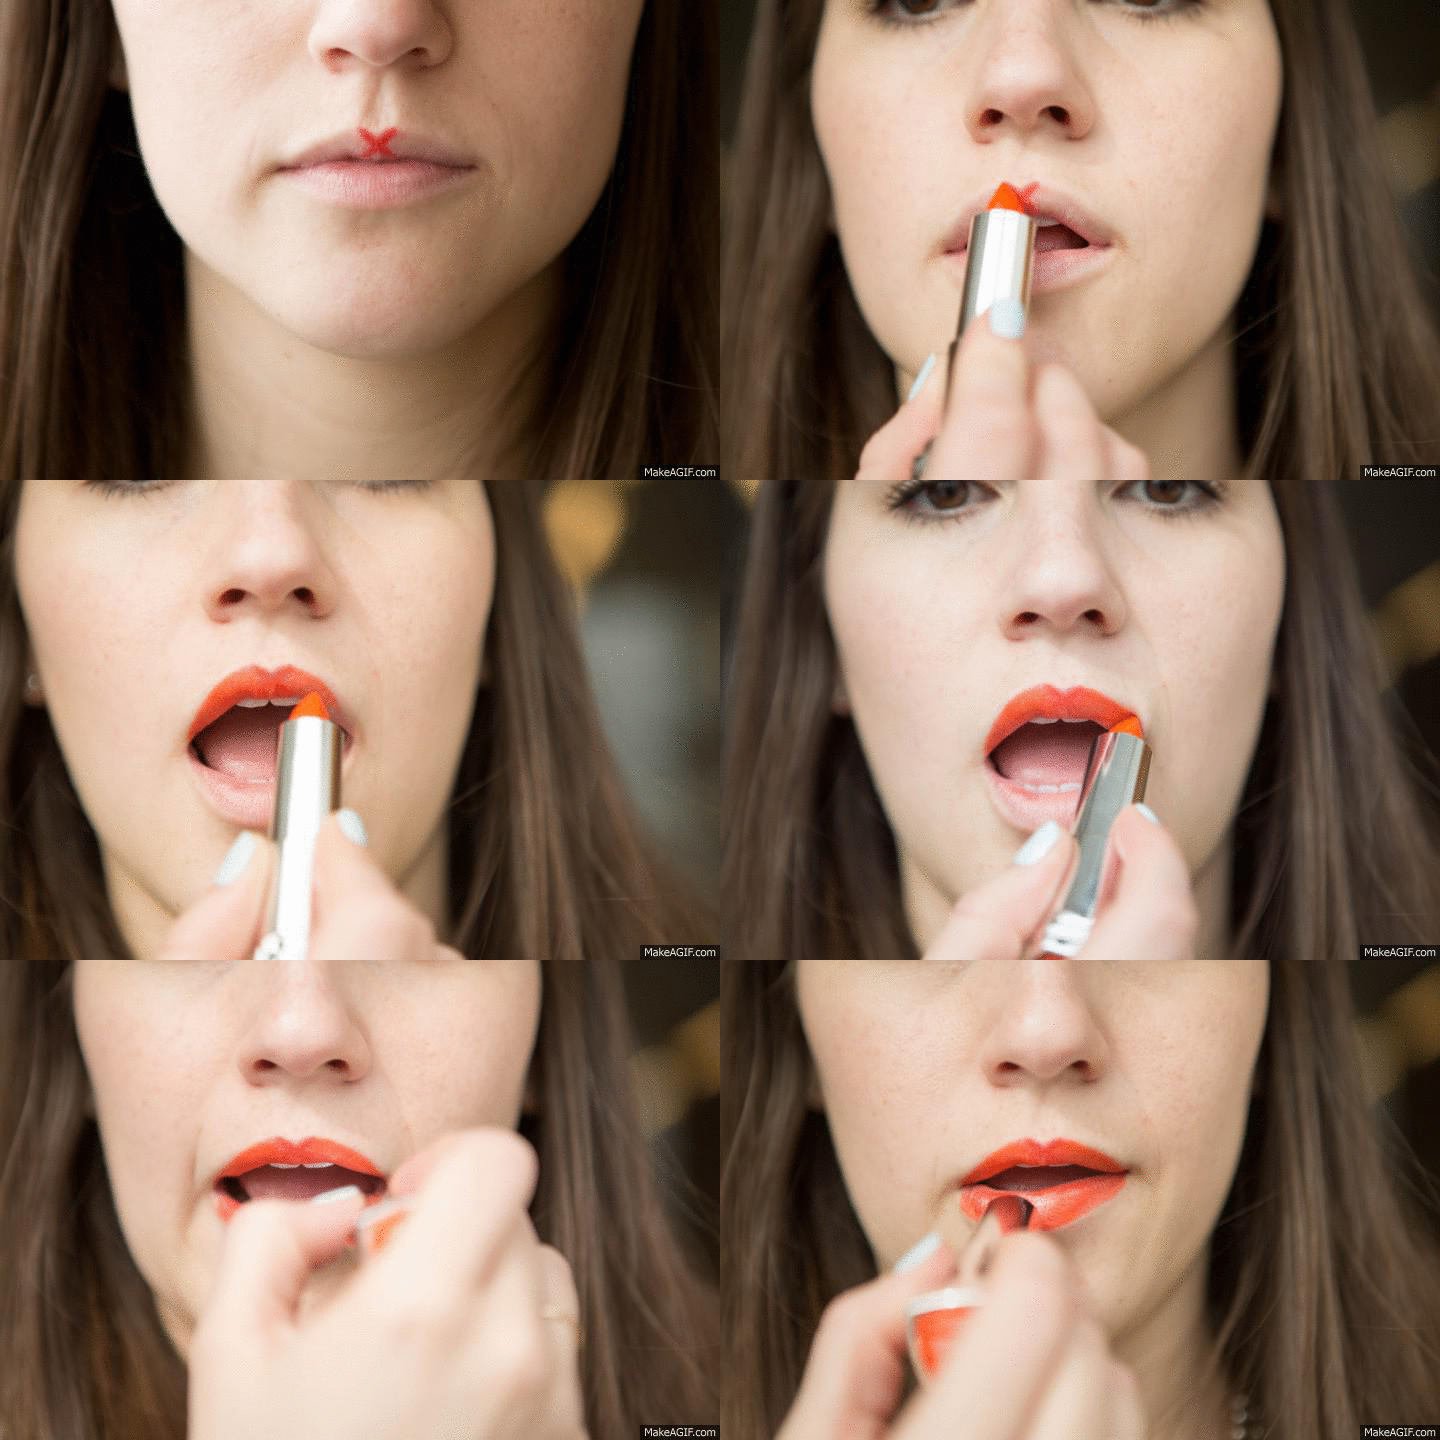
4. Perfect your Cupid's bow by drawing an "X" on your upper lip first as a guideline. 


To make the Cupid's bow part of your pout look perfect, the easiest and quickest way is to take a lip liner in the same shade as your lipstick and create an "X" at your Cupid's bow. Then, apply your lipstick as you normally would and voilà!


5. Conceal dark circles and puffy eyes the right way by creating a triangle with your cover-up.
 

You might be a fan of dotting on your concealer in the spots you need it, but the best way is it to actually apply it in a triangular formation with the base of the triangle directly under your lashline and the point toward the bottom of your cheek. This shape helps conceal any redness at the bottom of your eye and at the sides, and then instantly creates the illusion that your face is lifted, since the brightest point is the most intense under your eye.

6. Make contouring look more natural by using a pencil, pen, or makeup brush handle as your guide to finding exactly where your cheekbone is.

Not everyone's face is created equal, so where your BFF might be applying her bronzer might not be the best place for you to contour. To tell where you should be dusting on bronzer, roll a pencil, pen, or makeup brush handle right below your cheekbone (directly in the pocket underneath the actual bone) to find the right angle for your face. Once you've found the correct placement, dust some bronzer on your face using a contouring brush, and then diffuse the color so it looks natural. (Tip via makeup artist Lauren Cosenza.)

7. Map the contours of your face with a gel eyebrow pencil, since it's easier to apply precisely and blend in.

 
After you've applied your base, mark the areas you want to contour — the hollows under your cheekbones, your temples, along your hairline, jawline, the sides of your nose, the tip of the nose, and the crease of your eyes — with a deeply colored brow gel pencil, like IT Cosmetics Brow Power Perfector Gel Pencil in Auburn. Brow gel pencils are really concentrated, yet very smudgeable, and it's easy to control the placement of their dark pigment, making them perfect for contouring. Next, use an all-over cream highlighter, like Mac Cosmetics Cream Colour Base in Luna, on the tops of your cheekbones, on the center of your forehead, the bridge of your nose, the center of your chin, and on your Cupid's bow. (Tip via makeup artist Lauren Cosenza and this tutorial.)
8. Blot your face in a pinch with a clean toilet seat cover.

 
Initially, yes, this sounds gross, but both blotting papers and toilet seat covers are made out of similar fabrics and will help sop up excess oil on your skin. So, if you're in a pinch and headed to the bathroom to freshen up anyway, grab one of these covers and pat it over your skin to decrease any excess oil on your face.