Showing posts with label Makeup Tips That Nobody Told You About. Show all posts

Tuesday, 29 July 2014

15 Ways To Jump-Start Your Bridal Beauty Routine - PART 2 -


You're engaged -- that means it's time to step up your daily beauty routine. We've talked to the pros, and we're arming you with the tools for looking your best before, during and after your wedding.


8. Have a Day-Of Bag

Whether it's flyaway hairs or fall-off fake lashes, you should make sure you have an arsenal of bridal beauty fixers on hand the day-of; this means being prepared for any scenario. Start adding items as you begin to work out the details of your wedding, as well as during your makeup trials. You should have a plan of attack with your makeup artist should they not be there in a moment of need!
Want to splurge? If you don't have the time to pull it all together, you can buy premade kits. Our personal fave is The Knot Wedding Shop Bridessentials Survival Kit, complete with hair spray, clear nail polish, deodorant and all those things you haven't thought of. 


9. Have Your Brows Shaped

If you do your own tweezing, take this opportunity to splurge on brow shaping. The pros at salons will follow your advice, as well as offer suggestions for the best brow shape according to your face. Waxing is a popular option. Threading uses a cotton thread rolled along your skin to catch hairs. The process is quick and more precise than waxing (also, if you're on antibiotics or skin medications, threading is the safe way to go). Start shaping appointments six months out, waiting three to four weeks between sessions. Schedule your last shaping a month before the wedding in case you need to grow out any areas.
Want to splurge? See a brow specialist -- “someone specializing in the care and maintenance of your eyebrows,” says Kashuk. They'll know best for your brow line. 

bridal beauty \\ 15 Bridal Beauty Tips \\ Photo: PSandi Fell / The Knot

10. Do a Makeup Test Run

Besides your hair trial, you should also schedule a makeup trial. Have a trial at least three months before the wedding. This is where you'll fine-tune your look with your makeup artist so that you know exactly how you'll look the day-of.
Want to splurge? Hire your photographer to take photos of you after you've had your makeup done (or schedule your makeup trial the same day as your engagement photo session). This run-through will ensure you know how you look in multiple lights for your wedding photos. If your makeup looks too harsh or too subtle, have your makeup artist experiment and repeat.

bride holding flowers \\ 15 Bridal Beauty Tips \\ Photo: Michelle Holden / The Knot

11. Focus on Your Lips

Take care of your lips each night by applying a generous coat of lip balm or Vaseline. “Gently rub it over your lips in a circular motion with a wet washcloth,” says makeup artist Mally Roncal. This will exfoliate and soften your lips at the same time. Go for a glossy lip on your wedding day. A matte lipstick will look classic but may not hold as long, and could crack and wear down. Put a gloss over your lipstick to cover up those imperfections.
Want to splurge? Some salons offer special lip treatments that focus on exfoliating, moisturizing and energizing your lips! 

 fake eyelashes \\ 15 Bridal Beauty Tips \\ Photo : Sarah Kehoe / The Knot

12. Get Longer Lashes

If you weren't blessed with long lashes, consider trying false ones. Don't want to look overdone? Get a softer, more romantic look by applying half lashes in the outer corners of your eyes. Longer lashes will enhance the shape of your eyes and focus all attention on you. Don't want runny mascara on your wedding day? Try this: Apply your favorite mascara, and curl your lashes. Then apply a top coat of some waterproof mascara. This will give you beautifully curled lashes without the heavy feeling that many waterproof products have.
Want to splurge? Get semipermanent lash extensions at a salon. Extensions eliminate the need for mascara, which can actually lead to healthier eyes and lashes. They also last much longer than at-home kits. Applications stay on until they fall out naturally (you'll have to get touch-ups every two to three weeks). 


blonde bride smooth skin \\ 15 Bridal Beauty Tips \\ Photo: Grey Zisser / The Knot

13. Get Smooth Skin

Have a tough-to-treat spot like dry elbows? A good body scrub in the shower will get rid of dead skin. Then, moisturize with a good almond butter or shea butter lotion. Wrap your elbows in a cloth and keep the moisturizer on for about an hour.
Want to splurge? Get a full-body scrub at a salon for allover smooth skin. Go for a sugar scrub for a soft and sweet-smelling finish. 

bride long hair curls \\ 15 Bridal Beauty Tips \\ Photo: Keith Lathrop / The Knot

14. Have a Hair Plan

Work with your hairstylist to map out your hair care plan of attack. Try an at-home treatment with your favorite conditioner and mashed-up avocado. The creaminess of the avocado will increase your hair's silkiness. Start doing weekly treatments months before your wedding if you can. For an extra-glossy finish, look for shampoos and conditioners infused with olive oil. The oil helps tone down frizz and boost shine.
Want to splurge? Go to your salon and have your stylist give you a customized conditioning treatment for your hair type. For example, curly hair needs more moisture than straight hair. Your stylist will treat your hair type accordingly.

 red shoes with wedding dress \\ 15 Bridal Beauty Tips \\ Photo: Elizabeth Messina / The Knot

15. Plan Hair Removal
That little peach fuzz just above your upper lip may not seem like a big deal in your everyday life, but you don't want it showing up in wedding photos. Start getting monthly waxes for best results. Not into the pain? Salons now offer special waxes like chocolate wax and sugaring (a sugar paste), which are great if you're looking to walk out of the salon without too many sore spots. 
Want to splurge? Get ready for your honeymoon by booking laser hair removal appointments in one month intervals (three treatments are recommended for best results). After around seven treatments, the results can be permanent. 


Thursday, 17 July 2014

Doll Eyes Makeup Tutorial

This bold look has a very dramatic touch to it: that is why it is compared to a doll’s eyes. Its charm lines in the combination of black and white eyeliners. Here is how to achieve the same effect:

  • Apply a thick line of white eyeliner under your eye for a glowy look, then smudge with slightly with a thin brush.
  • Now using a black gel liner, contour the waterline from the middle to the outer corner of the eye.
  • Apply black liquid eyeliner on your upper lashline and finish it with a wing at the outer end.
  • Smudge the black color gently with a brush for a more dramatic finish.
  • Blend in the black and white colors in the outer end of the eye so that the transition is smooth.
  • Apply a generous layer of black mascara.
dolls eyes

Monday, 14 July 2014

8 Makeup Tips That Nobody Told You About PART 9

follow these tips to get that feminine look you always wanted 

1. Apply eyelash glue to false lashes with the tip of a clean bobby pin. 
  

Use the tip of a bobby pin to evenly disperse the glue along the base of your falsies. Then, wait a few seconds for the glue to get tacky and apply! 

2. For long-lasting lip color, swipe on your shade, lay a tissue over your mouth, and then dust translucent powder over it to set the color.


This process may seem extensive, but the payoff is worth it. Not only does the translucent powder set a bold shade, like Elizabeth Arden's Ceramide Lipstick in Rouge, making it instantly long-wearing, but the tissue acts as a shield to your lip color, protecting it from lightening or losing it's vibrancy. (Translucent powder, even though it's supposed to be clear, still has a subtle white tint to it that can alter your lip shade.) (Tip via makeup artist Lauren Cosenza.)

3. Mix loose pigments with a salve or petroleum jelly to make your own custom lip gloss. 

If you have loose eyeshadow pigments that you're obsessed with and want to wear as a lip shade, blend it with a little bit of a salve, like VMV Hypoallergenics Boo-Boo Balm, or petroleum jelly in a spoon and swipe it onto your lips. Voilà! 

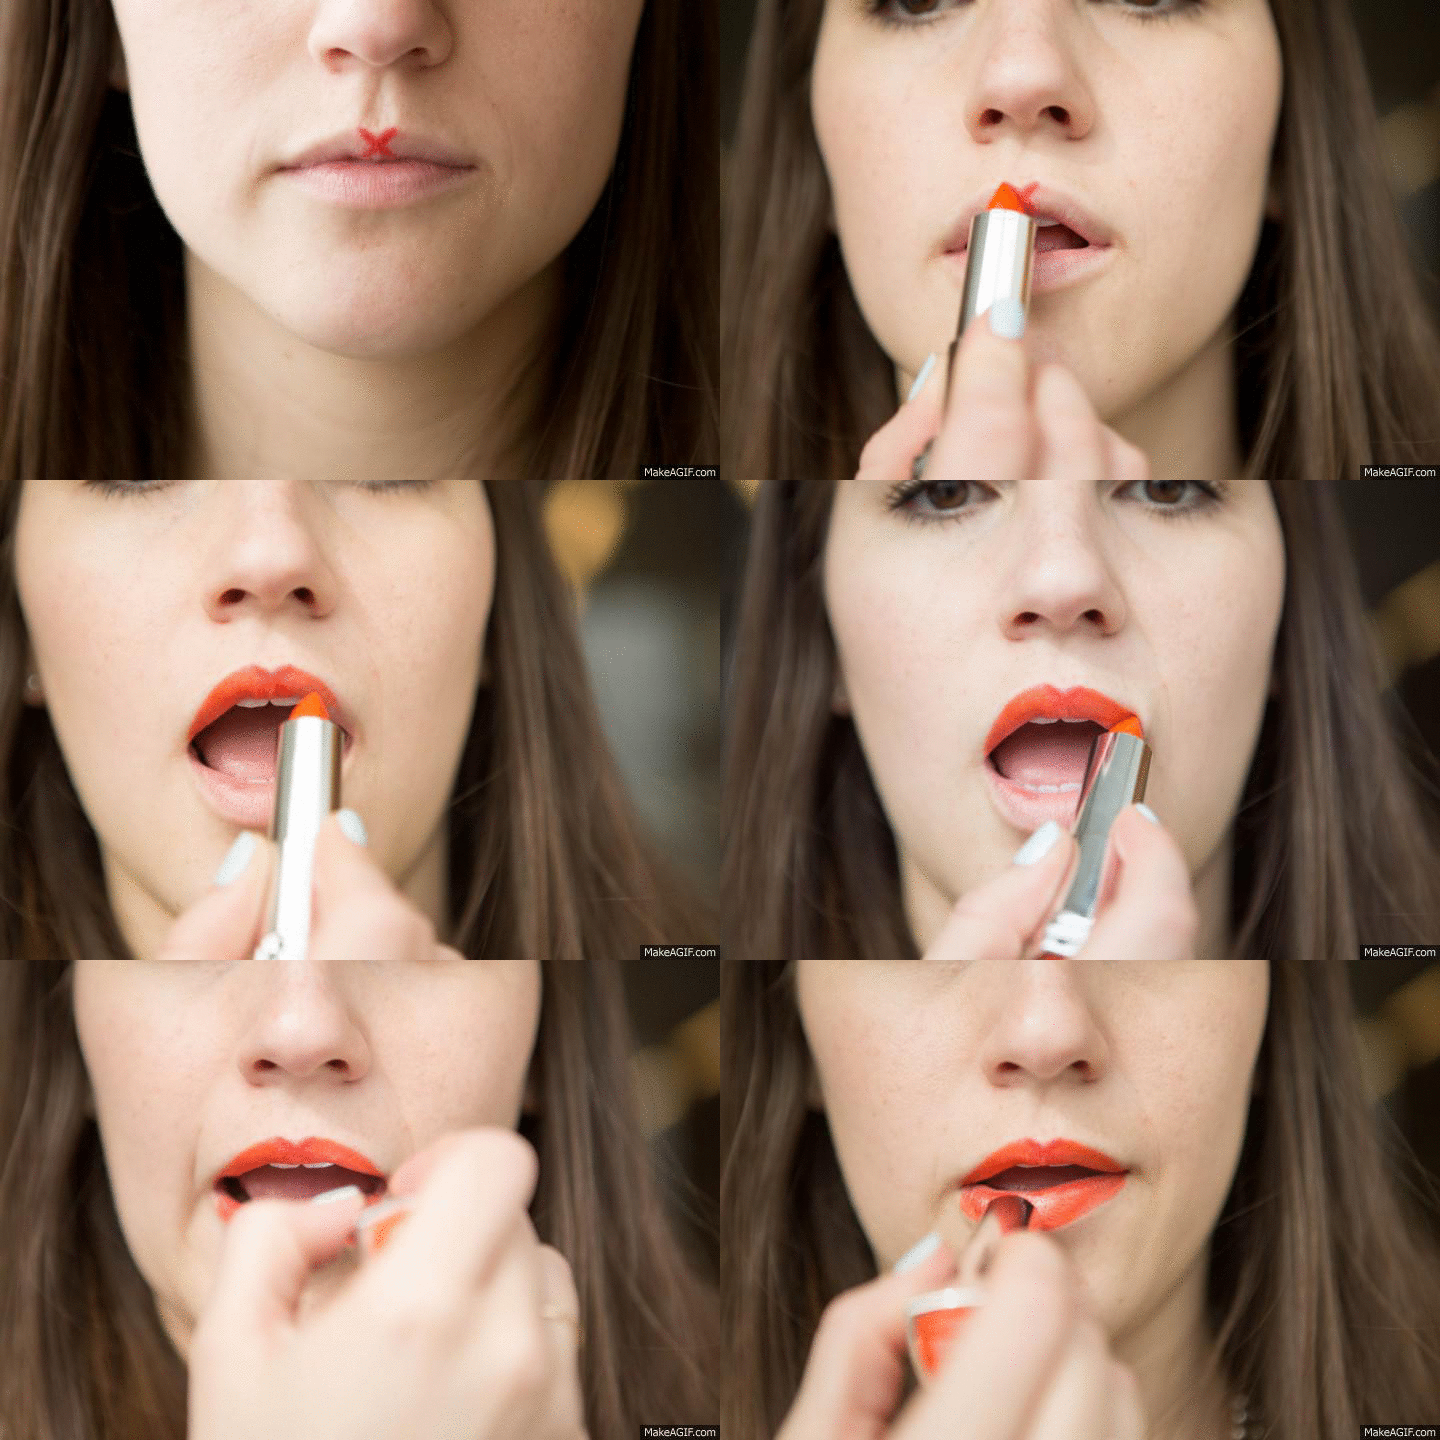
4. Perfect your Cupid's bow by drawing an "X" on your upper lip first as a guideline. 


To make the Cupid's bow part of your pout look perfect, the easiest and quickest way is to take a lip liner in the same shade as your lipstick and create an "X" at your Cupid's bow. Then, apply your lipstick as you normally would and voilà!


5. Conceal dark circles and puffy eyes the right way by creating a triangle with your cover-up.
 

You might be a fan of dotting on your concealer in the spots you need it, but the best way is it to actually apply it in a triangular formation with the base of the triangle directly under your lashline and the point toward the bottom of your cheek. This shape helps conceal any redness at the bottom of your eye and at the sides, and then instantly creates the illusion that your face is lifted, since the brightest point is the most intense under your eye.

6. Make contouring look more natural by using a pencil, pen, or makeup brush handle as your guide to finding exactly where your cheekbone is.

Not everyone's face is created equal, so where your BFF might be applying her bronzer might not be the best place for you to contour. To tell where you should be dusting on bronzer, roll a pencil, pen, or makeup brush handle right below your cheekbone (directly in the pocket underneath the actual bone) to find the right angle for your face. Once you've found the correct placement, dust some bronzer on your face using a contouring brush, and then diffuse the color so it looks natural. (Tip via makeup artist Lauren Cosenza.)

7. Map the contours of your face with a gel eyebrow pencil, since it's easier to apply precisely and blend in.

 
After you've applied your base, mark the areas you want to contour — the hollows under your cheekbones, your temples, along your hairline, jawline, the sides of your nose, the tip of the nose, and the crease of your eyes — with a deeply colored brow gel pencil, like IT Cosmetics Brow Power Perfector Gel Pencil in Auburn. Brow gel pencils are really concentrated, yet very smudgeable, and it's easy to control the placement of their dark pigment, making them perfect for contouring. Next, use an all-over cream highlighter, like Mac Cosmetics Cream Colour Base in Luna, on the tops of your cheekbones, on the center of your forehead, the bridge of your nose, the center of your chin, and on your Cupid's bow. (Tip via makeup artist Lauren Cosenza and this tutorial.)
8. Blot your face in a pinch with a clean toilet seat cover.

 
Initially, yes, this sounds gross, but both blotting papers and toilet seat covers are made out of similar fabrics and will help sop up excess oil on your skin. So, if you're in a pinch and headed to the bathroom to freshen up anyway, grab one of these covers and pat it over your skin to decrease any excess oil on your face. 

Wednesday, 25 June 2014

How To Do Your Makeup : 9 Tips That Will Change Your Beauty Life


Follow these tips to get that feminine look you always wanted
 
1. Those Summer Nights 

It's hard to go to sleep early when the sun is still shining by 8pm. But those long summer nights can take a toll on your face, especially your eyes. You might have given up on under-eye concealer. We suggest giving it another try using this technique. 


2. Look Over Here! 

Ultra-bold eye makeup will draw attention away from any signs of fatigue. It's also a great excuse to buy some high pigment shades.


3. The Highlight Map 

Apply light concealer on the parts you want to highlight, and a creamy bronzer to the parts you want extra shadowing. And of course, blend like you've never blended before. 


4. Sun-Kissed Rims 

Dramatic eyes are given a summery twist with golden eyeliner applied to the inner rims. Make sure to keep the rest of your face neutral and clean. 


5. Smokey Golden Eye 

A smokey eye done in gold and copper can make dark tired eyes look like they were part of the plan all along. Use the dark copper on top and the lighter gold on the bottom. 


6. Winged Liner + Red Lipstick 

It's a match made in makeup heaven. This look never goes out of style and it looks fantastic on practically everyone. It's a great distraction! 


7. Bright Face Colors 

A clean face with a dusting of pinks and golds looks refreshed and bright. Enhance it with a girly hair accessory.


8. The Triangle Under-Eye 

You want to apply your concealer in a triangular shape. Since the tip of the triangle is brighter than the rest of your face, it automatically makes your cheeks look lifted. 


9. Matte Skin 

You don't need to suffer from acne to use acne face wash. The salicylic acid in over the counter acne cleansers helps skin stay matte, which is especially important during the summer. 

Sunday, 15 June 2014

9 Makeup Tips That Nobody Told You About PART 8


With a few tips and tricks, you don’t have to be a professional to have fabulous looking makeup. It’s taken me years to learn my face shape, what colors flatter me, how much to apply, and how to apply it so that it looks beautiful and natural.


  1. Turn a pencil eyeliner into a gel formula with the help of a match or lighter.


Hold your black, green, burgundy, etc., kohl eye pencil (which typically creates a thin, harder-to-apply line), under the flame for one second, let it cool for 15 seconds, and then watch the consistency change right before your eyes. Finally, glide on your newly made gel liner for an instantly smudgier formula.

2. Cover your eyelid with white liner to make any eyeshadow shade pop. 


To make a sheer or less pigmented eyeshadow appear more colorful on your eyelid, take a white eyeliner pencil, like Make Up For Ever Kohl Eye Pencil in White, and run it over your entire eyelid. The opaque consistency of the liner will intensify any eyeshadow shade and make it pop instantly against your skin. (Tip via makeup artist Lauren Cosenza founder of Divalicious Blog.)

3. Draw your cat-eye first, and then fill in the open space for a perfect winged liner application every single time. 


It's much easier this way. Use this tutorial as your guide.

4. Use a spoon to create the perfect winged liner.


Holding the stem of a spoon against the outer corner of your eye, draw the straight line as the first step for your cat-eye. Then, flip the spoon so it's hugging your eyelid, and use the rounded outer edge to create a perfectly curved winged effect.  

5. Draw a slanted hashtag at the outer corner of your eye, and then blend it for an instantly smokey effect.


Left: Before; Right: After
To create a super-easy smokey eye, draw a hashtag symbol right before the outer corner of your eye and then blend it out with the smudger at the other end of your eye liner.

6. Use that same spoon to avoid mascara marks on your upper eye lid.


Hold the spoon so it's hugging your eyelid, and then apply your mascara like you normally would. As you sweep the mascara wand against your lashes and back of the spoon, watch as the residue coats the back of the utensil rather than your skin.

7. Add saline solution to a flaky mascara formula to re-wet it.  


You're only supposed to keep mascara for three months, because beyond that point, it can collect bacteria and lead to eye infections. However, if your mascara dries up within those three months, revive it with a couple drops of saline solution.

8. Hit your eyelash curler with a hair dryer to heat it up, so your lashes curl easier. 


Blowing hot air on your eyelash curler will help your lashes curl easier and stay curled longer; it works the same way heat changes the pattern of your hair and holds a curl with a curling iron. To do it, hit the lash curler with your blow dryer until it heats up, wait until it cools slightly but is still warm (you want to be sure not to burn your eyelid), and then clamp down on your lashes to curl them.

9. Dust on translucent powder in between coating on mascara to plump up your lashes.


The translucent powder helps grip the mascara in between coats, leaving you with fuller lashes. Try out this tip by following this tutorial. 

10 Makeup Tips That Nobody Told You About PART 7

We all put on makeup (at least some of the time), but is your technique yielding the best possible results?


Here, Kimberly Soane, the director of artistry at Bobbi Brown, offers up some simple pointers to make sure we're using everything from concealer to bronzer to mascara right.


Never put concealer or foundation on your eyelids as a base, it will cause your eye makeup to crease.

Use your fingers to apply your foundation if you want sheer coverage and a brush if you more polished, medium to full coverage.


Always apply powder where you are shiniest first, which it usually your T-zone, with a very light dusting everywhere else.


You should put bronzer on your neck, face, and chest to even out your skin tone. Be sure to take a step back and make sure everything is the same color.


When applying blush, first smile, then start on the apple of the cheek, blend the blush back towards the top of the ear, then down toward the jawline.


Always apply your brow pencil or powder to the upper portion of the eyebrow to lift your face up.


You want to make sure your lipstick is not too defined at your cupid’s bow (the top of your lip), and that it goes all the way out to the inner corners of your mouth. Be sure to press down hard as you apply. 


Always start with a base shadow without any shimmer that matches the lightest skin tone on your face and apply all over your lid up to the brow. You should use this base shadow to make sure the darker shadows used on your lid up to the crease are properly blended. 


Instead of looking straight ahead at the mirror, get as close to it as possible, stick your head up and bring your chin toward the mirror. You want to look down as you apply, starting at the inner corner and making sure to go all the way out to the fold on the outside of the eye.  


You don't want to do quick soft motions when you apply mascara. Instead, jam the wand into the root of the lash and do zigzag motions as you go up.