Thursday, 24 July 2014

Homemade Creams for Old Stretch Marks


Ingredients for the homemade stretch mark cream
The lavender and lemon essential oils in the following home remedy for stretch marks have excellent healing powers on the skin. They help to reduce the redness of stretch marks and optimize the skins natural regenerative powers.


Ingredients you will need:

1/2 oz (15g) Beeswax
1/2 oz (15g) Cocoa butter
2 oz (50g) Coconut Oil
2 tablespoons (30ml) Evening Primrose Oil
1 teaspoons (5ml) Ylang Ylang essential oil
1/2 teaspoon (3ml) Lavender essential oil
1/2 teaspoon (2ml) Lemon essential oil
4 tablespoons (60ml) mineral water


Equipment you will need:

Heavy stainless steel saucepan
Wooden spoon
Dark or clear glass jars


How to make the homemade stretch mark cream

Over a low heat melt the beeswax, cocoa butter, coconut and evening primrose oils in a large, heavy based stainless steel saucepan.
With a spoon beat in the spring water until you have a smooth mixture.
Take the saucepan off the heat and stir it until it has cooled to body temperature (37 C).
Add the ylang ylang, lavender and lemon essential oils then mix thoroughly to make a smooth cream.
To stop the oil and water separating stir until the cream has completely cooled, then spoon into airtight jars. In order to ensure the essential oils are well preserved, clear jars need to be kept in a dark place
.
making-homemade-stretch-mark-cream3
Massage the cream gently into your skin where your stretch marks are. Use this homemade stretch mark cream daily after either a bath or shower and your skin will feel softer after just a few days.


Tuesday, 22 July 2014

How to get rid of Cellolite fast and avoid it !!!


Nobody wants to go to the beach and show off cellulite skin but almost all women get cellulite at some point of their lives. The only thing we can do is to slow the formation of the “orange skin” by eating certain foods and avoiding others and, of course, doing regular exercise. Here are some Do’s and Don’ts of battling cellulite:


  • Drink at least 1 glass of fresh orange juice a day. As we know, citrus fruits are the biggest enemy of “orange skin”.
  • Avoid drinking too much coffee and tea because they help wash off all the mineral substances in your body. If you drink them, don’t put sugar. Also, you shouldn’t drink alcohol more than a glass of wine a day.
  • Follow a diet. Maybe the most important thing is to be careful what you eat. Stay away from proteins and carbohydrates.
  • Eat potatoes for cellulite-free skin. Because they’re high in potassium, they help your body release wate faster. You can also eat avocado, bananas, cabbage, wheat, barley, mushrooms.
  • Alternate hot and cold dishes. For lunch eat cold dishes and for dinner – hot.
  • Eat food high in lecithin – eggs, soy, cauliflower.
  • Eat food high in antioxidants – strawberries, pomegranate, grapes and citrus fruits.

how to enlarge your chest !!


Every woman knows how the chest affects the confidence. Many of them are trying to do everything they can to at least make their breasts bigger. From push-up bras till these “magical” pills.


However, a recent research showed us that there are actually a few types of food, which can help the process of enlarging your chest measurement. The reasoning behind the small-chested women is the hormonal disbalance – when the testosterone has a larger production, the breasts are smaller.
If this can be controlled by consuming a smaller amount of some fruits and vegetables, you can increase the level of estrogen in your system.
For example grain food, such as brown rice, oats and barley can help your chest grow. The producing of estrogen can be stimulated with cherries, blueberries, strawberries, chick-peas, parsle, different kinds of grain food and chicken meat.
Healthy proteins are also very important and they can be found in the carrot, cucumber, pumpkin, onion, cabbage, beetroot and the cauliflower.
After all, the food rich on proteins and minerals are important for the chest to enlarge.

Wax Your Forearms


This is an ancient Arabic beauty secret, including 1 cup of sugar, 2 tbsp of water, 1,5 tbsp of lemon juice and 1 tsp lemon, which is optional.


Combine the ingredients in a saucepan and simmer on low heaat until the mixture gets thicker. It should also turn golden-brown. Stir with a spoon and watch as the mixture gets to a shade of darker brown. This is how you prepare the wax itself.

 wax
 
When you wish to use it later, 10 seconds in the microwave should be enough to warm it up

Hearts and Kisses


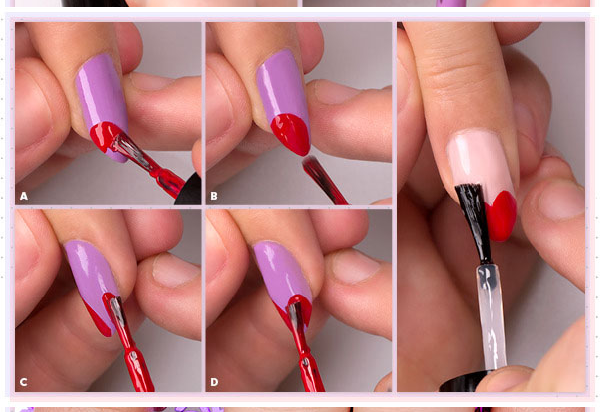
Having a romantic nails doesn’t mean it’s Valentine’s Day, you are just in that kind and loving mood that you want to express it by your look. See how to make beautiful heart-shaped tips for your nail decoration:


Choose pale colors for the base.
For this style your nails must be in Almond shape.
Take your favorite red nail polish and draw the hearts on your tips as it is shown at the picture.

heart 
 
Put on a romantic dress and be the most girly girl at your town.

Wide Eyes trick !

Here is a trick for smokey shadow style which will make your eyes look wide open:


Start by applying a thin line of eyeliner at the upper eyelashes line.
Take a medium brush and apply thick line of grey shadow just above the crease.
Use the same shadow to form a shape of cat eye style, but leave the eye lid nude.
Apply neutral shadow to the eye lid.
Take a soft white eye pencil to open the eye by applying it at the inner corner of the eye.
Don’t forget about the mascara.

makeup eyes
Make your lips look juicy and pink.
Done with the doll-like look!

Monday, 21 July 2014

How-To: Chic Shoelace Braid

If you think this style is impossible to replicate, think again. Hairstylist Cash Lawless shows you exactly how to recreate this chic, badass shoelace braid in minutes!


The tools you'll need:

1. Volumizing mousse
2. Hair elastics
3. Bobby pins


1. Give your hair grip.

Apply Philip B. Russian Amber Imperial Volumizing Mousse from root to end to give your hair grip, so your shoelace braids stay in tightly and the hairs don't slip out.

2. Begin tying two pieces of hair, on either side of your part, like you would a shoelace.


Part your hair down the middle, and then grab two pieces of hair on either side of your part at the point of your hairline. Tie them in a loose knot as if you're tying your shoes.

3. Add small pieces of hair to the sections you're tying.

Similar to French braiding, add small pieces of loose hair to the sections that you're tying in knots as you angle the braid down toward your ear and back toward the crown of your head.


4. Pin the shoelace braid halfway between your hairline and your crown.

Hold the braid in place by crisscrossing two bobby pins. Repeat steps one through four on the other side of your head.

5. Gather all your hair in a ponytail.

Once your two shoelace braids are secured with bobby pin "X" formations, take all the remaining hair and pull it into a high ponytail, securing it with an elastic hair band.

6. Fishtail braid the ponytail.

To fishtail braid, divide the ponytail in half and take a tiny piece of hair from the left half of the ponytail and cross it over to the right half. Then, take a piece from the right half and cross it over, incorporating it with the left half of your hair. Continue all the way to the end of your ponytail.

7. Wrap the fishtail braid around the base of the ponytail. 

Position the braid in a circle on its side so you can see all the detail, and then pin it down with a bobby pin.


How to put on your stick on bra. Step by step guide

 Check out How to Put on your Stick in bra

1. Clean your breasts with soap and water.
2. Make sure the area is dry and do not use any moisturizers before applying.
3. Remove the plastic from the back of the stick on bra and place on your breasts. For maximum lift, hold your breast up before placing the cup on, starting with the underneath of your breast first and then pressing the bra onto the top part of your breast.
4. Join the front-clasp on the bra to pull the bra together creating a nice cleavage.
5. It is advisable to remove your stick on bra at the end of the day.

howto

How to clean your stick on bra. Step by step guide
1. Always wash straight after use.
2. Gently hand wash with soap and lukewarm water. Do not leave to soak in water.
3. Leave the stick on bra to air-dry.
4. When dry the self-adhesive regenerates making the bra perfect to wear again.
5. Finally, make sure the stick on bra is put back in its casing; dust will reduce the adhesive’s effectiveness