Showing posts with label nail polish beauty. Show all posts

Tuesday, 22 July 2014

Hearts and Kisses


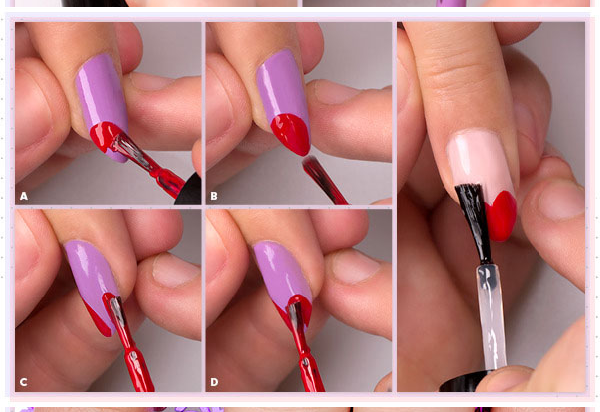
Having a romantic nails doesn’t mean it’s Valentine’s Day, you are just in that kind and loving mood that you want to express it by your look. See how to make beautiful heart-shaped tips for your nail decoration:


Choose pale colors for the base.
For this style your nails must be in Almond shape.
Take your favorite red nail polish and draw the hearts on your tips as it is shown at the picture.

heart 
 
Put on a romantic dress and be the most girly girl at your town.


Tuesday, 24 June 2014

Cheer on with football manicures


Support your favourite team at the ongoing FIFA World Cup 2014 with nail art inspired by the country's flag


You've got your favourite team's jerseys and shorts, but there's one thing female football fans can have for themselves during the World Cup that men can't — nail art. From footballs to flags of the countries contending for the trophy, there is lots to choose from. The demand for football-inspired nail art has increased in salons in the country even before the matches began. The top favourite is Brazil, followed by Spain, Australia, England, Chile and Argentina. Getting special World Cup inspired manicures at a nail studio turns out to be expensive. Although it looks elaborate, this nail art can be achieved at home. We got 13-year-old DIY enthusiast Nerissa Chen to show us how to get it right. "The fuss-free way to go about this yourself is through nail extensions. This way, you can use both hands to carefully paint the design of the flag on the acrylic nail," she says.

You can even change your nail art, depending on who is playing that week. Get creative with this fun beauty trend. Let the team you are vouching for adorn all nails except one, which can be painted with small footballs. You could even paint alternate nails a velvet green to represent the football field's grass.


Not rooting for any one team in particular? Do a multi-cultural take by having different flags on your fingertips. Or do away with flags and have a mix of small versions of the Brazuca (the ball players will be kicking around this year) and Brazil's mascot Fuleco! Says Nerissa, "For an eye-catching effect, play around with different textures like glitter, matte, gel and velvet. Once you have painted all the extensions, apply a small drop of nail glue on your fingertip and the acrylic nail, and seal it. Give a final top coat of transparent polish so that the design doesn't chip and stays longer. Even the most unsteady hands can pull off these ideas, so don't be afraid to experiment."

Sunday, 22 June 2014

Lovely Nails in Grey and Neon Yellow

 Check out this tutorial and see how to recreate the next awesome nail design, ideal for the summer.

neon nail design

  • You will need grey and neon yellow nail polish, as well as some tape.
  • First paint your nails with yellow and make sure it is completely dry, before proceeding to the next step.
  • Cut three thin tape stripes for each nail and stick them in the middle of the nail, as shown on the picture.
  • Finally, apply the gray nail polish and remove the stripes carefully.

neon nail design


Voila! You are a proud owner of gorgeous nails. Don`t forget the top coat – this will protect the manicure and make it last longer.

Friday, 20 June 2014

Striped Nail Art – Easy Steps

If you are looking for fancy nail art , do this wonderful nails ! A few different colors of polish, small scissors and thin tape will be all you’re going to need.


Cut the tapes into pieces before you begin, so it will be easier, and just follow the steps in the picture below. Good luck!


 tape manicure
You're Done =) 

Nail Design – Rock It!

If you are not a big fan of the bright colors, or the neon ones you should try this gorgeous black leather effect for your manicure.


  • First polish your nail with classic black nail polish. Let it dry. 
  • Stick thin tape strips in order to make diamond-shaped gaps.
nail manicure - diy
  • Fill them with matt black nail polish.
  • Remove the strips carefully.
  • Enjoy your gorgeous nail art!


How to Avoid Bubbly Manicures

 I know you all hate it when you manage to do your nails perfectly and then after a few hours you look down only to see the bubbles. Well, now you will know how to avoid them!


  • Clean your nails with a polish cleaner, even if they haven’t been polished.
  • Dry your nails off if you have moisturized them.
  • Don’t even think about shaking the tube of polished ever again! You can swipe it back and forth, if you think it needs it.
  • Keep your coats thin.
  • Don’t use a fan or a dryer to quicken the drying process of your nails, bubbles will appear if the top layer has dried before the one underneath.


Saturday, 14 June 2014

How to Make Your Own Glitter Nail Polish

Neon colors for your nails are a huge summer trend. Whether it is yellow, pink or green, neons bring a certain freshness to every look! Glitter is another great trend: with its sparkly effect it can brighten up your mood very fast!


Apply a nail base first for stronger nails. Then spread some glitter on them, so that it can stick. Use a see-through neon nail polish over the glitter for an amazing result.


Now you can enjoy your DIY manicure which will carry you through the breezy summer nights with parties on the beach and beautiful sunrises!


Sunday, 25 May 2014

Colorful Beautiful Tape Nail Art

Beautiful manicure for you ladies .


Here are the steps and technique  how to create it 
.
First apply base coat in this case white .

Then make fewyellow  spots over your nails . Around the yellows dots apply pink polish such as at the second and third picture .

And again around the pink polish apply blue . When it’s dry place the tape as shown at the tutorial each tape should start from the yellow dot .

After that apply black layer of nail polish . Remove the tapes and apply top coat . Ta-da super easy !


Tuesday, 29 April 2014

How to apply nail polish neatly

Women love to paint their nails in different colours, but only a few know how to pain their nails neatly. While going to a parlour might be an easy option, learning to apply nail polish can help you save some big bucks. 


We offer you some tips...

Soak your hands in water: 

To soften your cuticles, soak your hands in warm water for a couple of minutes.

Remove the cuticles:

Use a cuticle pusher and remove the cuticles. Also, shape your nails before you start off with the process.

Apply a base coat: 

For your nail paint to stay longer, it is best to apply a base coat first. Apply it from the cuticle and go until the tip of your nails.


Choose your colour and paint your nails: 

Choose your colour first and then paint your nails from left to right. Don't bother if it goes off your nails. Continue to apply and allow it to dry for four to five minutes.

Apply a second coat: 

Once it's dried, apply a second coat. Again, don't bother it goes off your nails.


Soak your hand in soap water: 


Once your nail polish dries, fill some soap water in a small tub and soak your hands in it for a few minutes. Now, brush off the nail polish that went off your nails. Soak for a couple of minutes, and you are set!

Make your own nail polish

Here's how...


1. Find eye shadow in the colour in which you want your nail polish.
2. It's better if the eyeshadow is a loose powder, but if it is a solid block, you will need to crush it.
3. Make a small funnel out of an envelope or a note card.
4. Get a bottle of clear nail polish and place the
funnel over the top. Pour the eyeshadow in with the funnel. Add some glitter if needed.


5. Shake the bottle until the powder and glitter are evenly distributed. Add a drop of water if they don't disperse well. And voila, you have your own nail
polish!


DIY tools for your nail art kit

Fancy doing your own nails, but don't want to spend too much? Here are some nail-art tools that you can make from things lying around the house. They help create the perfect dots, lines and just about any design you set your mind to.


Detailing brush

What it is:

These brushes, which are the easiest and most efficient of all tools, are a must have for any nail - art designer. There is no end to their usefulness, as they can be used to draw anything from thin stripes to intricate flower patterns. A good detailing brush will also prevent smudging and lumpy polish.

How to make it: 

Take any paint brush and cut its bristles till you get a thin brush. In order to avoid cutting too much, start from one side and cut a few strands at a time. You can also use old eyeliner brushes after thoroughly washing them and occasionally dipping them in nail polish remover to prevent the bristles from getting dry.


Dotting tool

What it is: 

A dotting tool is essential to get the perfect polka-dot design.

How to make it:

Multiple items can be used to get cute dots — a toothpick, the back end of a paintbrush, a driedup ball pen or a round-tipped pin. Different-sized dots can be achieved by using different tools.

Manicure strips

What it is: 

Apart from helping one sport a trendy manicure, these strips help create neat geometric designs with ease.


How to make it: 

Cut small strips of cellotape and stick them on butter/trace paper. This will also help you reuse them. Ideally, these strips are half a centimetre each, but feel free to experiment.


(Contributed by Meera Nair)

Thursday, 17 April 2014

How to get stunning gel nails

There's nothing like a fresh coat of nail polish to help you complete your look. Even better, being able to flaunt those beautiful nails for 2-3 weeks.


Style Gel is best recommended to working professionals who have to be groomed all the time. It is a time saving service. Sounds like a dream, but is it safe for your nails? There are a lot of myths about gel nails that range from silly to outrageous.

Gel manicures are a relatively new trend. Here's how it works: a special type of gel polish is applied to the nails and then cured under a UV or LED light. This hardens the polish into a glossy coat that's super durable and resists chipping. Unlike acrylics, you don't have to drill or file down your natural nails. Gel nails are also odorless and don't require the same harsh chemicals to apply. So you end up with a manicure that stays chip-free and shiny for up to four weeks. And best of all, they dry instantly!


Human anatomy, states that nails cannot "breathe" in principle. There is no oxygen in the nail plate, and it does not need it. Nails, teeth, hair are all dead fabric, within which there are very thin channels to produce oil or moisture. That's why our nails shine and do not break. If there was air at the top of the plate, not even super materials would stick to it.

Acetone should never be used on gel nails or even normal nails as they damage the nail bed, alternately one must use a nail remover. You can apply a different nail color on your Gel colors nails and can remove it with a Nail Polish Remover. Your Gel color will continue to remain intact & you will also get a change in style.

Dos and don'ts to help your gel nails last longer

Do's: 

- Respectyour skin, nails & health. Wear rubber gloves for all cleaning, scouring, sanding, painting etc.
- File only Preferably, get your nail technician to do this.
- When damaged, get your nails REPAIRED by your nail technician as soon as you can.
- Remember, your nail extensions are JEWELS not TOOLS. While nail extensions is tough, it is not indestructible!
- Use acetone free nail polish remover.
- Soak fingers in warm water & mild soap 5-10 minutes to soften dirt, then scrub gently underneath nail with a nail brush or soft toothbrush.


Don'ts:

- Don't expose your nails to harsh chemicals, petroleum products, abrasives or household cleansers to avoid crumbling of gel nails.
- Don't bite or cut your nail extensions as it can shatter damaging your natural nail plate.
- Don't glue broken or lifted extension nails. Glue isn't watertight.
- Don't use your nail extensions to open cans, or anything else that puts them at risk of breaking.
- Don't use acetone or regular nail polish remover.
- Don't gouge dirt from under your nails with pins, needles, metal nail files or any other sharp object. You may cause infection under nail.

(Inputs by: Lakme Salon)
Monday, 14 April 2014

Black and White Nail Design


For those of you who love the classic black and white combination, we have a great nail art idea. So make sure your have black and white nail polish handy and we are ready to start. In this case the base is white, but it also looks that great if the base is black.


So paint all of your nails white, then draw a thin, curved line, which outlines the black area and simply fill it in using black nail polish.
It is that easy, but looks fabulous. Don`t forget to apply a top coat, which will make you nail polish stay longer. Enjoy your stylish nail design.


Thursday, 3 April 2014

Quick guide to take car of brittle nails

Brittle nails are a major worry as they break off causing a worry. Here's the quick guide. 


Nails need your attention if they are going brittle. It upsets you as it kills the look of beautifully pedicured-manicured fingers. Here's a guide to take care: 

When washing dishes, wear dish-washing gloves. 

Also, to keep your hands soft and moisturized and your nails hydrated, apply hands cream and for feet, apply petroleum jelly or natural oils (olive oil, coconut oil, almond oil), and slip on cotton gloves and socks before you go to sleep. You may massage cuticle oil on fingers. When you wake up, your hands, nails and cuticles will be moisturized. 

You may massage cuticle oil on fingers before going to sleep, it works wonders. 

Chemicals such as acetone and others found in nail polishes can take away moisture from your cuticles. Spending a lot of time with your hands in water or hot water can also soften your nails, causing them to break easily. 


Thoroughly remove any polish you might have on your nails. Clip your nails short. If you have a habit of biting your nails, quit it. Leave your nails naked, let them breathe. 

Avoid direct exposure to harsh sunlight. Cover your feet with socks when walking or commuting on two-wheelers. 

Also, indulge in a healthy diet. Specifically protein based. It will make your nails stronger.